 I decided to plant some pineapples a while back, because who doesn’t like pineapple? I only told a few people about this endeavour but one of those was particularly interested and wouldn’t be around to see them grow and fruit. I suggested that I could make a pineapple cam to monitor their growth from anywhere and soon became busy with work, my studies and an overseas exchange program. I was recently reminded of this fact and so this quick-turn project began.
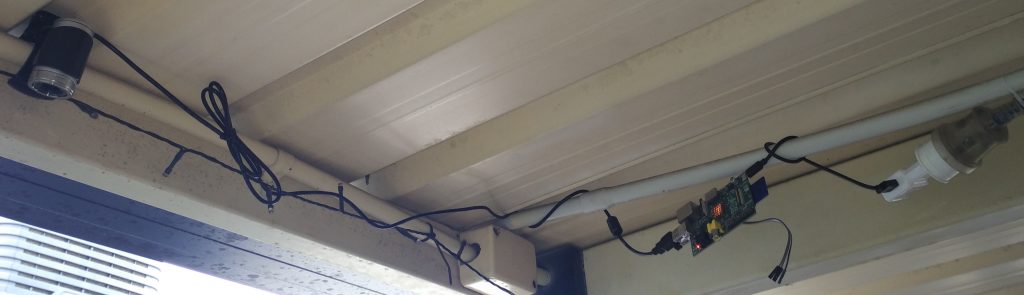
The first step was hardware, I already had a few Raspberry Pi computers and a spare USB WiFi adapter laying around, plus I recalled buying three of the cheapest USB webcams I could find (for destructive testing, maybe another time). Having the necessary hardware on hand I began looking at available software packages/libraries.
 Not wanting to reinvent the wheel, a quick search found a popular post on implementing a similar project. This write up is based upon this post plus additional steps, extra input on how to start from scratch, (some) security considerations and hopefully a more rounded procedure.
Installing the operating system
Raspbian was selected as the operating system for this project, it is a debian derivative configured specifically for the raspberry pi and well documented.
The latest raspbian images may be downloaded here, for this project the “Raspbian Jessie Lite” image was used.
Under windows, Win32 Disk Imager comes widely recommended for imaging SD cards.
Once the SD card has been imaged, the SD card can be inserted into the Pi and booted with a USB keyboard, WiFi adapter (if not using ethernet) and TV/monitor. On first boot, the Pi will complete its installation and you will be left at the login prompt.
SSH access and networking
A fresh raspbian install has only one user capable of logging in, the “pi” account with a default password of “raspberry”. This account is a “sudoer” where the “sudo” utility may be used to execute commands as the root user.
After logging in, first change the password by typing “passwd” then use the configuration utility to give the Pi a useful hostname, enable remote access (SSH) and set the timezone. Open this utility by typing “sudo raspi-config“. SSH access will be found under the Interfacing Options menu.
If WiFi will be used for networking then the following steps will also need to be taken:
Check that the adapter has been found and the network is in range with “sudo iwlist wlan0 scan”
Save your network credentials by using the following command “sudo nano /etc/wpa_supplicant/wpa_supplicant.conf” and add your credentials to the bottom of the file in the following format
[code]
network={
ssid="YourNetworkName"
psk="YourPassword"
}
[/code]
If you have any problems then consult the official guide
Now, whenever the system reboots it should automatically connect to the WiFi network and be accessible via SSH. Test this by entering “sudo reboot” which should display the network IP at the login screen.
Windows PCs require a utility to use SSH, by far the most popular is PuTTY and I prefer to pair it with WinSCP for a more capable/versatile environment although only PuTTY is required for this project.
Software setup
After logging in via SSH using the Pi’s IP or hostname, the system should be updated by running the following commands
sudo update
sudo upgrade
The first command looks for available updates and the second will upgrade each package to the latest version.
This system will run two processes in parallel, one will acquire images from the camera and the other will serve/stream those images to a web browser.
With the webcam plugged in, install fswebcam to handle the image captures with “sudo apt-get install fswebcam” and test that it’s working with “fswebcam image.jpg” to check that the webcam is accessible.
Motion JPEG Streamer has been chosen to handle the web-facing side of things. The latest version of the code can be downloaded using subversion/SVN but this utility must first be installed with “sudo apt-get install subversion“. Then the latest code may be obtained, the folder opened, depenancies installed and the program built with the following commands:
[code]svn co https://svn.code.sf.net/p/mjpg-streamer/code/mjpg-streamer/ mjpg-streamer
cd mjpg-streamer/mjpg-streamer
sudo apt-get install libjpeg8-dev
sudo apt-get install imagemagick
make[/code]
If everything goes well then the make command should complete successfully.
Security and initiating at boot
Now that the two applications exist, they must be configured to run in the background on reboot and the web-facing component run as a dedicated user. Use the adduser command to create a new user account, I chose “pinapple” as a username and entered “sudo adduser pineapple“. You will be prompted to enter and confirm a password, all other details can be skipped by pressing enter. By default, this user will not have sudo access (a good thing).
For this process/user to interact with others we will create a folder that the webcam images may be saved to and accessed. As the system is running from an SD card and the images are constantly being overridden, I decided that this folder should exist solely in RAM. The mount tmpfs command is used to create a temporary file system in RAM upon reboot, this is derivative of the ramfs command.
Upon reboot we want the system to perform the following tasks:
- Create a folder name for the ram folder
- Mount a portion of RAM as this folder (2MB in this case)
- Make that folder accessible by all users
- Continually capture webcam images as the ‘Pi’ user and background the task
- Start the streaming server as ‘Pineapple’ user and background the task
On non-systemd installations, such as this one, the rc.local file is automatically executed as the root user on boot. To achieve the goals above, add the following code to the bottom that file with “sudo nano /etc/rc.local”
[code]
mkdir /tmp/stream
mount tmpfs /tmp/stream -t tmpfs -o size=2097152
chmod 777 -R /tmp/stream
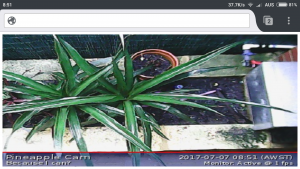
su pi -c ‘fswebcam -S 15 –flip h,v –jpeg 95 –shadow –title "Pineapple Cam" –subtitle "Because I can?" –info "Monitor: Active @ 1 fps" –save /tmp/stream/image.jpg -q -l 1 &’
su pineapple -c ‘LD_LIBRARY_PATH=/usr/local/lib mjpg_streamer -i "input_file.so -f /tmp/stream -n image.jpg" -o "output_http.so -w /usr/local/www -p 8080" &’
[/code]
The code above will skip 15 frames (as the quality of initial frames may be bad) before capturing 1 frame each second and flipping it in both directions (fswebcam manual here), the web server will start serving on port 8080 (unofficial documentation here).
Please note that running the server on port 80 will require additional steps as this is a reserved port, proxying the address (as is done here) or running the server as root are possible workarounds.
If your system uses systemd (or Raspbian migrates to systemd) then follow the directions here to enable execution of rc.local on boot.
After rebooting the system your Pi should initiate both the frame acquisition and web serving tasks. Test this by loading http://hostname:port or http://IP:port in your web browser and you should see the default mjpg streamer page containing a capture from your webcam.
Customising the web page
If this page loads properly then you can substitute the main page with a custom one displaying just the stream. The Pi’s web directory defaults to /usr/local/www/ and the following code may be used to test a new root/index page.
First move the current index to a new/backup location with
sudo mv /usr/local/www/index.html /usr/local/www/index.html.bak
Then create a new index file with
sudo nano /usr/local/www/index.html
and insert your new html code such as
[code]
<html>
<head>
<title>Page Name</title>
</head>
<body>
<center>
<img src="/?action=stream" height="100%" width="100%" />
</center>
</body>
</html>
[/code]
The result
Here’s a comparison between the plants themselves and the stream, although the screenshot was taken on a rainy day.